How to Install Phpmyadmin in ubuntu.
What is phpmyadmin?
phpMyAdmin is a free and open source tool written in PHP intended to handle the administration of MySQL or MariaDB with the use of a web browser. It can perform various tasks such as creating, modifying or deleting databases, tables, fields or rows; executing SQL statements; or managing users and permissions.
Before installing phpmyadmin if you want to install LAMP to your server checkout here
How To Install Linux, Apache, MySQL, PHP (LAMP) stack on AWS Ubuntu
Step One — Install phpMyAdmin
To get started, we can simply install phpMyAdmin from the default Ubuntu repositories.
We can do this by updating our local package index and then using the apt packaging system to pull down the files and install them on our system:
sudo apt-get update
sudo apt-get install phpmyadmin
This will ask you a few questions in order to configure your installation correctly.
- For the server selection, choose apache2.
- Select yes when asked whether to use
dbconfig-commonto set up the database - You will be prompted for your database administrator’s password
- You will then be asked to choose and confirm a password for the
phpMyAdminapplication itself
The installation process actually adds the phpMyAdmin Apache configuration file into the/etc/apache2/conf-enabled/ directory, where it is automatically read.
The only thing we need to do is explicitly enable the php5-mcrypt extension, which we can do by typing:
sudo php5enmod mcrypt
Afterwards, you’ll need to restart Apache for your changes to be recognized:
sudo service apache2 restart
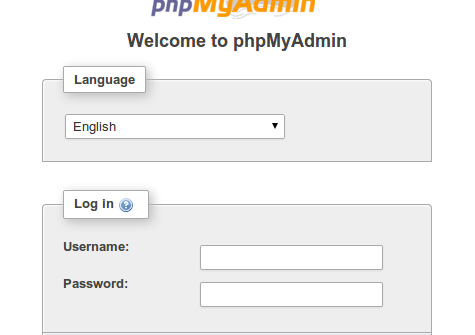
You can now access the web interface by visiting your server’s domain name or public IP address followed by /phpmyadmin: http://domain_name_or_IP/phpmyadmin
You can now log into the interface using the root username and the administrative password you set up during the MySQL installation.
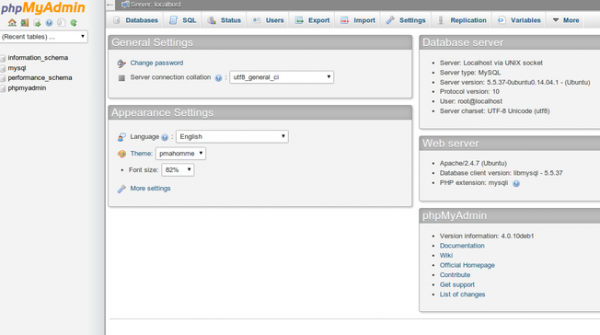
When you log in, you’ll see the user interface, which will look something like this:
Step Two — Secure your phpMyAdmin Instance
We were able to get our phpMyAdmin interface up and running fairly easily. However, we are not done yet. Because of its ubiquity, phpMyAdmin is a popular target for attackers. We need to secure the application to help prevent unauthorized use.
One of the easiest way of doing this is to place a gateway in front of the entire application. We can do this using Apache’s built-in .htaccess authentication and authorization functionalities.
Configure Apache to Allow .htaccess Overrides
First, we need to enable the use of .htaccess file overrides by editing our Apache configuration file.
We will edit the linked file that has been placed in our Apache configuration directory:
sudo nano /etc/apache2/conf-available/phpmyadmin.conf
We need to add an AllowOverride All directive within the <Directory /usr/share/phpmyadmin>section of the configuration file, like this:
<Directory /usr/share/phpmyadmin>
    Options FollowSymLinks
    DirectoryIndex index.php
    AllowOverride All
    . . .
When you have added this line, save and close the file.
To implement the changes you made, restart Apache:
sudo service apache2 restart
Create an .htaccess File
Now that we have enabled .htaccess use for our application, we need to create one to actually implement some security.
In order for this to be successful, the file must be created within the application directory. We can create the necessary file and open it in our text editor with root privileges by typing:
sudo nano /usr/share/phpmyadmin/.htaccess
Within this file, we need to enter the following information:
AuthType Basic
AuthName "Restricted Files"
AuthUserFile /etc/phpmyadmin/.htpasswd
Require valid-user
Let’s go over what each of these lines mean:
- AuthType Basic: This line specifies the authentication type that we are implementing. This type will implement password authentication using a password file.
- AuthName: This sets the message for the authentication dialog box. You should keep this generic so that unauthorized users won’t gain any information about what is being protected.
- AuthUserFile: This sets the location of the password file that will be used for authentication. This should be outside of the directories that are being served. We will create this file shortly.
- Require valid-user: This specifies that only authenticated users should be given access to this resource. This is what actually stops unauthorized users from entering.
When you are finished, save and close the file.
Create the .htpasswd file for Authentication
Now that we have specified a location for our password file through the use of the AuthUserFiledirective within our .htaccess file, we need to create this file.
We actually need an additional package to complete this process. We can install it from our default repositories:
sudo apt-get install apache2-utils
Afterward, we will have the htpasswd utility available.
The location that we selected for the password file was “/etc/phpmyadmin/.htpasswd“. Let’s create this file and pass it an initial user by typing:
sudo htpasswd -c /etc/phpmyadmin/.htpasswd username
You will be prompted to select and confirm a password for the user you are creating. Afterwards, the file is created with the hashed password that you entered.
If you want to enter an additional user, you need to do so without the -c flag, like this:
sudo htpasswd /etc/phpmyadmin/.htpasswd additionaluser
Now, when you access your phpMyAdmin subdirectory, you will be prompted for the additional account name and password that you just configured:
http://domain_name_or_IP/phpmyadmin
After entering the Apache authentication, you’ll be taken to the regular phpMyAdmin authentication page to enter your other credentials. This will add an additional layer of security since phpMyAdmin has suffered from vulnerabilities in the past.
Arjun is a Full-stack developer, who is fond of the web. Lives in Chikmagalur, Karnataka, India